

Most advice on how to create a blog post outline amounts to this: write your H2s, then fill them in. That gets you a list of headings, but it doesn’t make the draft any easier, because the hard parts of drafting aren’t about headings. They’re about decisions. What is the article actually answering? Which ideas deserve a full section? What comes first? What can be cut?
A good outline isn’t a list of headings. It’s a set of decisions that makes the draft easier to write. Make those decisions early and you avoid the expensive version of the same problem: discovering in paragraph twelve that two sections say the same thing, then rewriting text you had already polished. This guide covers the decisions in the order you’d make them.
What Is a Blog Post Outline?
Learning how to create a blog post outline starts with understanding its purpose. A blog post outline is the planned structure of one article: the question it answers, the sections it contains, the order of those sections, and short notes on what each one needs to cover.
An outline is related to a few other parts of blog planning, but each serves a different purpose.
- An idea list is raw material. Nothing has been sorted or decided yet.
- A content brief covers the target keyword, audience, and competing pages. The outline turns that information into the structure of the article.
- A content calendar decides when the article gets published. If you need that layer, see my guide to creating a blog content calendar.
- The finished article is the full prose. The outline only contains the decisions and notes that guide it.
Across a whole blog, these work at different levels. Content strategy decides what the site should cover, the calendar decides when to publish it, and the outline decides how one specific article is built.
1. Start With the Main Question Your Article Needs to Answer
Write the question before you write any headings. If you don’t know what the article is supposed to answer, the headings can turn into a collection of related information instead of a coherent article.
Take a broad topic like “blogging.” Nearly anything could go under it. Narrow it to “how to create a blog post outline” and the scope improves. Narrow it again to the reader’s real problem, something like “How do I organize my ideas before writing a blog post?” and you have something to test the article against.
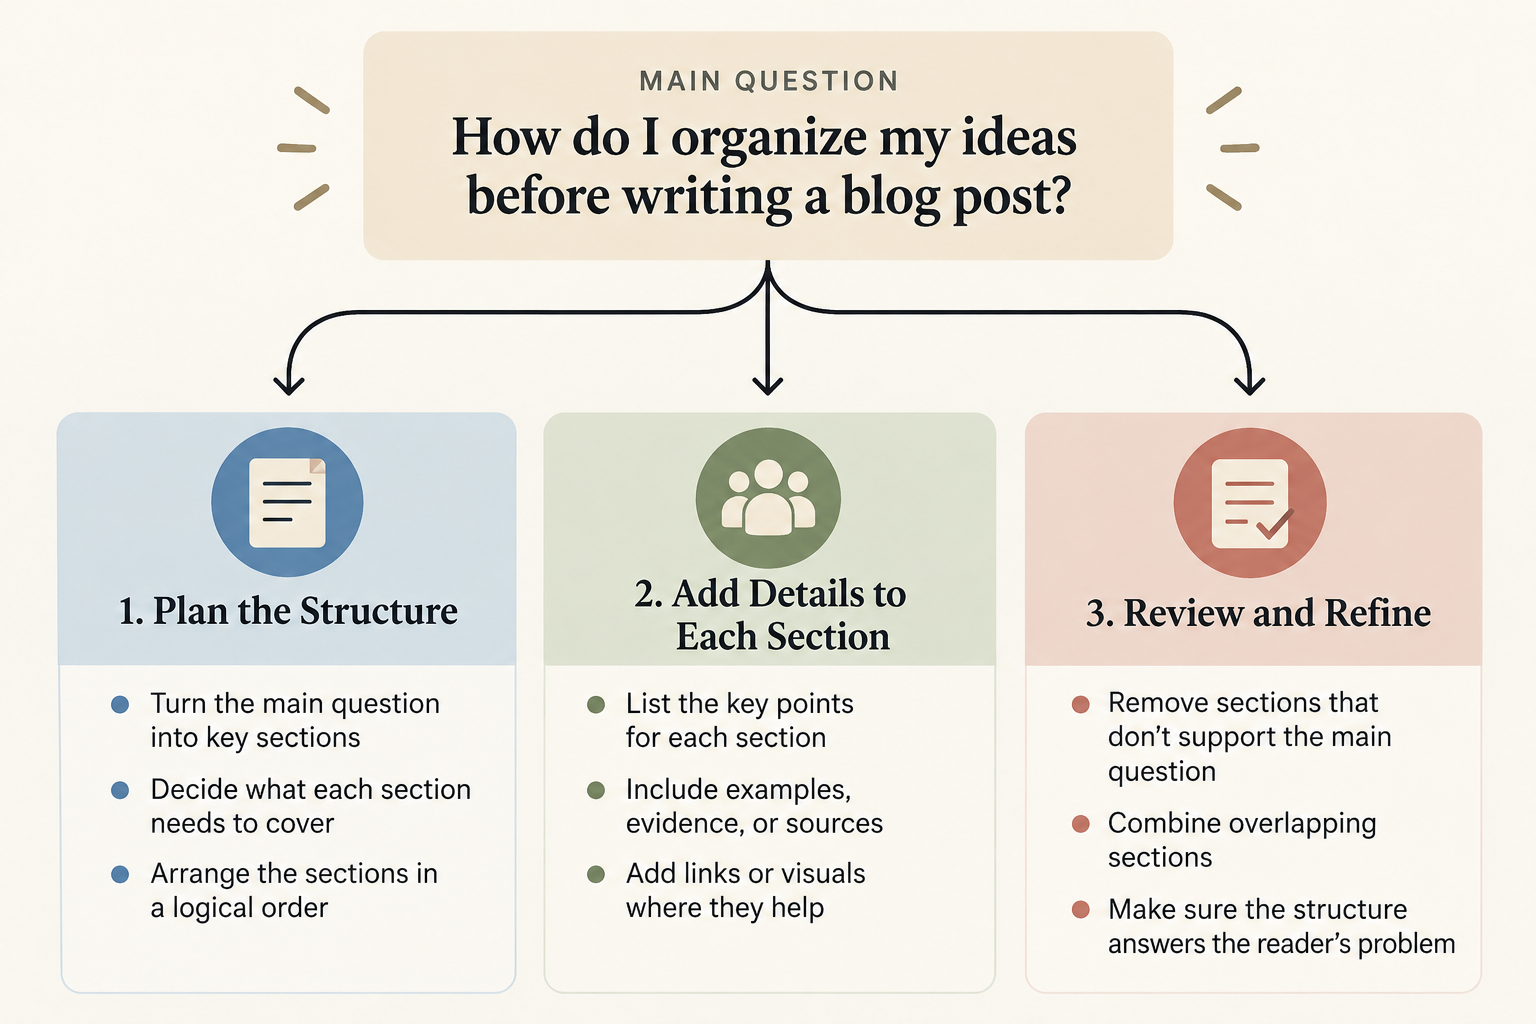
That last version works as a filter. A section on the history of outlining does nothing for someone trying to organize their ideas. A section on deciding what to cut does. The clearer the article’s job, the easier every later decision gets.
2. Check Search Intent Before Building the Outline
Keyword research tells you what people type. Search intent tells you what they expect to find. Two pages can target similar phrases and still need different structures because one reader wants a definition while another wants a template.
Before you settle on a structure, search your target phrase and read the first page like an editor. Look for four things:
- Recurring questions. If most results answer the same handful of questions, readers probably expect them answered.
- Common sections. Shared headings show what counts as baseline coverage.
- Format. Step-by-step guides, templates, and comparisons each signal something different about what the reader wants to do.
- Gaps. Look for places where results say “do this” without explaining how to decide. That’s where you can be more useful.
Treat the results as research, not a blueprint. If you copy the headings from the top five pages, you’ve written a sixth version of the same article. For broader guidance on creating useful, search-friendly content, see Google’s SEO Starter Guide.
For the keyword side of this process, see my guide to keyword research for a new blog.
3. Turn Reader Questions Into Useful Sections
Reader questions are useful raw material for an outline. Someone learning how to outline a blog post will likely wonder what an outline includes, how detailed it should be, and how the sections should be organized. Those questions can help shape the structure.
But not every question deserves an H2. A question earns its own section when it represents a meaningful part of the reader’s problem. If it’s only a supporting detail, it can live as a paragraph, bullet, example, or sentence inside another section.
For example, “Should I use bullets or numbers in my outline?” doesn’t need its own section. A sentence in the template can answer it. “How detailed should an outline be?” does deserve its own section because the answer affects how the reader builds the rest of the outline.
Ask yourself whether removing a section would leave an important part of the reader’s question unanswered. If it wouldn’t, the information may fit better somewhere else. If yes, it probably deserves to stand alone. If not, fold it into another section or leave it out.
Avoid creating sections just because a question exists. The goal is a useful structure, not a heading for every possible question.
4. Put the Sections in an Order That Makes Sense to the Reader
The order you researched things in is almost never the order a reader should meet them. Research is messy. You find a statistic first, a definition later, and a useful example somewhere in between. If your outline follows your notes, the article can start to feel like a tour of your browser history.
Instead, ask what the reader needs to understand before the next section will make sense. Sometimes that’s problem first, then solution. Sometimes it’s basic to advanced, or a concept followed by its application. When the reader is doing something in sequence, a step-by-step structure makes more sense. For ideas that are difficult to grasp in the abstract, a question followed by an explanation and example can work well.
The structure matters less than the reasoning behind it: let the reader’s need to understand the subject determine the order. Put each section where it makes the next section easier to understand.
5. Add Enough Detail Under Each Section to Make Drafting Easier
A heading tells you the topic. The notes underneath tell you what the section needs to accomplish. For most sections, four things are enough:
- Purpose: what the section needs to accomplish for the reader.
- Key points: the two to four things it needs to cover.
- Example or evidence: what you’ll use to make the point concrete.
- Source, link, or visual: where relevant.
You won’t need all four for every section. A simple definition needs less planning than a section that makes an argument.
The test is simple: when you start drafting, can you write the section without having to figure out what it’s supposed to say? If yes, the outline has enough detail. If you’d have to stop and rethink the point, add more notes.
6. How Detailed Should a Blog Post Outline Be?
An outline can fail in two directions: too vague or too detailed.
| Too vague | Useful | Too detailed |
| “Keyword research” | Purpose, key points, and one example | Full paragraphs under the heading |
| “Write the article” | The evidence you’ll use and where it comes from | Finished, polished sentences |
| “Optimize it” | Relevant links and visuals noted | Basically the whole draft |
A vague outline looks organized but leaves the real decisions for drafting. An overly detailed one means you’re writing the article twice: once in the outline and again in the draft.
A technical comparison needs more planning than a short explainer. The more decisions a section requires, the more useful it is to work them out before drafting. A technical comparison needs more planning than a short explainer. If someone else or an AI tool will draft from your outline, your notes also need to provide enough context for them to understand what you mean.
A good warning sign is when you catch yourself polishing sentences. That’s the draft talking, so move on.
7. Blog Post Outline Template
This blog post outline template gives you a practical starting point when learning how to create a blog post outline. Copy it, adapt it to your topic, and delete anything you don’t need.
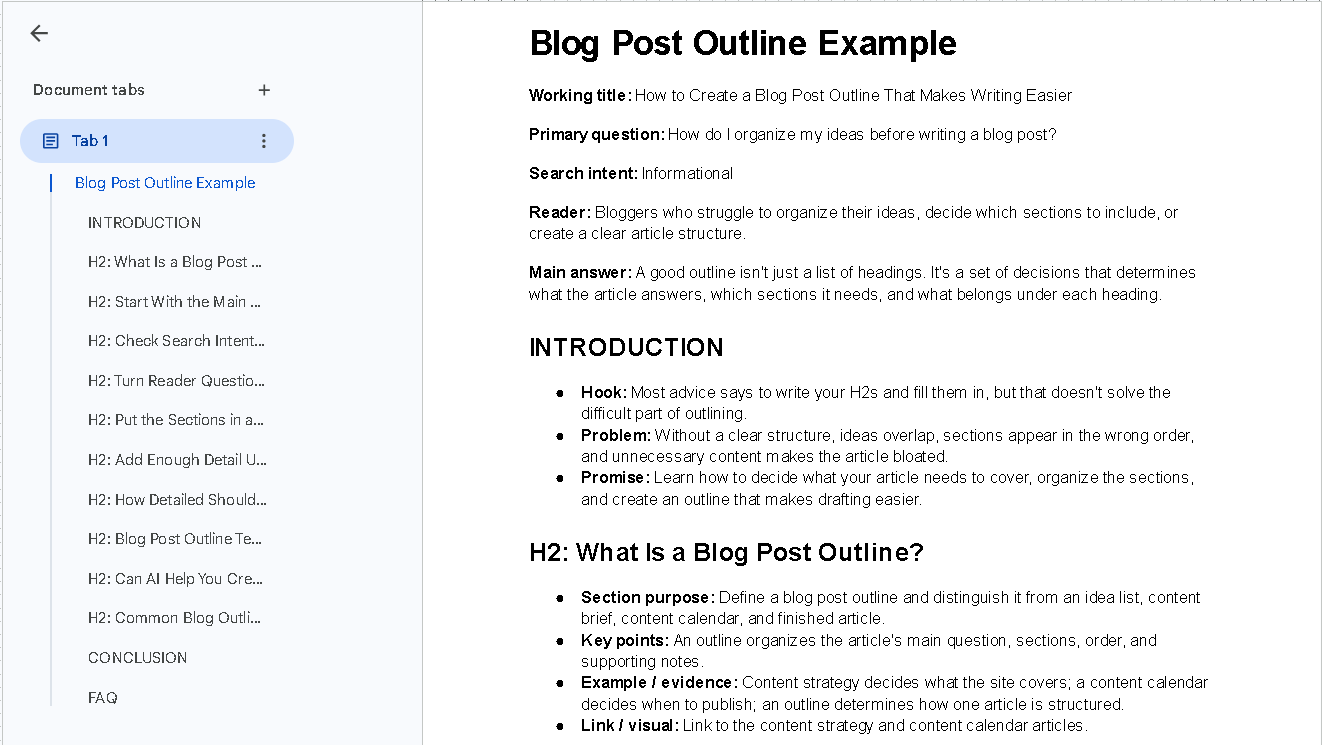
I prefer using Google Docs to plan my articles because I can access my outline from different devices and continue working wherever I am. It also has built-in heading styles, including Heading 1, Heading 2, and Heading 3, which help me organize sections and keep the document easy to navigate.
The top block does most of the work. If you can’t clearly define the primary question and main answer, the headings aren’t ready yet. You can use this template in Google Docs, Notion, or a plain text file.
8. Can AI Help You Create a Blog Post Outline?
Yes, as a source of options. AI can help brainstorm reader questions, suggest sections, spot missing subtopics, reorganize messy notes, and propose alternative structures.
What it can’t do is make the editorial decisions for you. It doesn’t know your angle, so it can easily produce a generic structure based on what it has seen elsewhere. You still need to decide what belongs, which sections overlap, what should be removed, and what is actually useful to the reader.
A practical workflow is:
- Decide the main question and angle yourself.
- Ask AI for possible structures.
- Compare the suggestions against your question.
- Remove anything unnecessary.
- Build the final outline yourself.
Once the outline is solid, any drafting tool or collaborator has far less to guess about. For the writing stage, see my guide to how to write an SEO blog post.
Common Blog Outline Mistakes to Avoid
- Starting with headings before knowing the article’s purpose. Write the main question first, then let the headings answer it.
- Copying competitor headings. Use them as research, then structure the article around your reader’s problem.
- Creating too many tiny sections. If a heading has only a couple of sentences under it, consider merging it with a neighboring section.
- Making the outline too vague to help. If you’d have to rethink a section while drafting, the outline hasn’t done its job.
- Writing the entire article inside the outline. Stop at points and direction. The prose belongs in the draft.
FAQ
What should a blog post outline include?
At minimum, include the main question, the reader, your angle, the sections in order, and short notes about each section’s purpose and key points. Add examples, sources, links, or visual ideas where they help.
How many H2s should a blog post have?
There’s no required number, and no particular number is better for SEO. Use as many as the article has distinct jobs. If you’re padding to reach a certain count or cramming several ideas into one section, the structure needs adjusting.
Can AI create a blog post outline?
Yes. AI can generate possible structures and help identify gaps, but you should still choose the angle, remove overlap, and make sure every section serves the reader.
Conclusion
An outline isn’t paperwork before the real writing begins. It’s where you make the structural decisions that make the writing easier: what the article answers, what it leaves out, and how the reader moves through it.
Before drafting your next article, write down the question it needs to answer. Build the headings around that question, add notes where you need them, and remove sections that don’t help the reader. Once you know what each section needs to do, you can spend less time reorganizing the draft and more time writing it.